You proudly managed to install your own Galera cluster. Nice! But there is no data on it.
If you have a new application, you can count yourself lucky, and can deploy it straight away on your Galera Cluster, as if it were a normal MySQL database.
However, sooner or later you will have a situation, where you have to import old data into a Galera Cluster. If it is live data, it should be doable without downtime.
Plan
"Well planned is halfway done, and halfway done is mostly enough."
- old Finnish proverb -
Normally, if a MySQL database is running as replication slave, it cannot be configured as replication slave for another MySQL master. Galera replication is however not MySQL replication. So, in addition to Galera multi-master replication, we can have a normal MySQL replication. Either to feed data into the cluster, or to source the data to an external database, e.g. for business intelligence uses.
We will thus initialize a replication from the current live MySQL towards the Galera Cluster, and after replication is running nicely, we will point the application towards the load balancer of the Galera Cluster, minimizing the downtime of the operation to mere seconds.
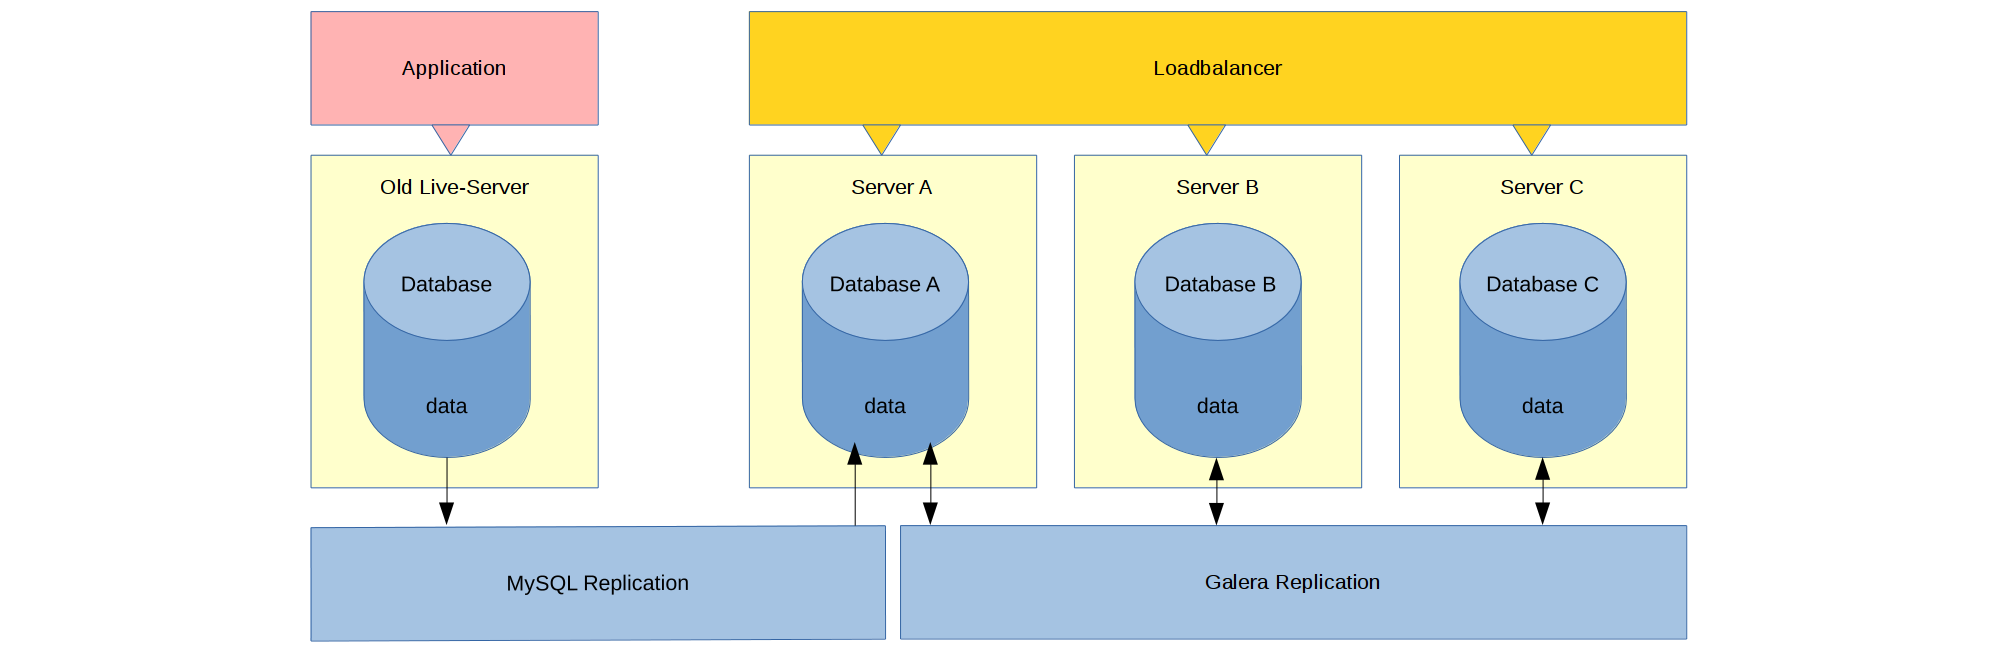
MySQL replication can replicate into one Galera Cluster node, which then replicates the changes through Galera replication to all other cluster nodes. Note that during the replication process you have to connect directly to that one Galera Cluster node, because the replication configuration can exist only on one node at the same time; it is not a cluster wide configuration.
Replication initialization
The target Galera Cluster has already its own mysql-, information_schema- and performance_schema-databases, so we want to omit those from the replication dump.
DBS=$( mysql --defaults-file=/etc/my.cnf --column-names=0 \
-e "select schema_name from information_schema.schemata \
    where schema_name not in ( 'information_schema', 'mysql', 'performance_schema' );" 2>/dev/null | tr '\n' ' ')
echo $ALL_DBS_FOR_INSTANCE
Then a dump must be created from the current live database:
mysqldump --defaults-file=/etc/my.cnf --databases ${DBS} --master-data=1 \ --single-transaction --ignore-table=mysql.inventory | gzip -c1 > dump_for_replication.dmp.gz
Note: If you have views which use direct MySQL users in your databases, you should at this point create those users also temporarily on the Galera Cluster. Otherwise, missing users might lead to dump loading errors. If you do, please remember to remove those temporary users at the end of the migration.
Before loading the replication dump on the Galera cluster, let’s configure the first Galera node to have the current live server as a replication master. In reverse, it means that the first Galera node becomes a replication slave to the current live server.
In the CHANGE MASTER command below, change IPOFLIVEDATABASE with the IP of your live database. Also, replace REPLICATIONUSERNAME and REPLICATIONPASSWORD with your user name and password of your MySQL replication user. If you do not have a MySQL replication user on your live database, create it with the following command:
CREATE USER 'REPLICATIONUSERNAME'@'%' IDENTIFIED BY 'REPLICATIONPASSWORD';
GRANT REPLICATION SLAVE ON *.* TO 'REPLICATIONUSERNAME'@'%';
If you do not want to replicate the full database, limit the user above accordingly.
After all previous prerequisites are fulfilled, you may configure your first Galera node to have a replication master:
CHANGE MASTER TO
          MASTER_HOST='IPOFLIVEDATABASE',
          MASTER_PORT='3306',
          MASTER_USER='REPLICATIONUSERNAME',
          MASTER_PASSWORD='REPLICATIONPASSWORD';
As the replication is prepared on the first Galera node, let’s go back to your live database server.
If you have a large database dump, like they usually are, it is recommended to use the nohup utility program for avoiding disturbances while loading the data.
Therefore, we will create a small loading script, which in turn will be ran with nohup.
cat >> loadDump.sh < "EOF
#!/bin/bash
dumpfile=$1
gzip -cd  < ${dumpfile} |  mysql --defaults-file=/tmp/galera01.cnf --host=10.12.130.11 --port=3576
EOF
In the defaults-file /tmp/galera01.cnf you must have the proper credentials for the root user on your first Galera node. Replace again IPOFFIRSTGALERANODE, USERNAMEONFIRSTGALERANODE and PASSWORDONFIRSTGALERANODE with your first Galera node IP, user name, and password respectively.
cat >> /tmp/galera01.cnf < "EOF
[client]
host='IPOFFIRSTGALERANODE'
port='3306'
user='USERNAMEONFIRSTGALERANODE'
password='PASSWORDONFIRSTGALERANODE'
EOF
When all bits and pieces are in place, begin the dump loading with nohup:
nohup /opt/eproot/Shared/Packages/loadDump.sh dump_for_replication.dmp.gz > loadDump.log 2>&1 &
You can observe the dump loading process by tailing the log file:
tail -f loadDump.log
Essence of time itself
Be patient, loading can take a very long time.
Start replicating
After the replication dump is finally loaded, you can check that your replication is properly configured:
mysql --defaults-file=/tmp/galera01.cnf
SHOW SLAVE STATUS\G
If everything matches to the settings configured earlier, you can start the replication:
mysql --defaults-file=/tmp/galera01.cnf
START SLAVE;
After the replication slave status item “seconds behind master” reaches 0, your replication is running orderly. You may now choose a suitable date for switching the application towards the load balancer of the Galera Cluster.
Switch
You should execute the following procedure on your test system for minimal downtime.
First close your live application. This can mean either shutting down your application completely, or configuring the maintenance web page on your web layer load balancer.
After all application-related database connections are closed towards your live database, you can stop your replication.
mysql --defaults-file=/tmp/galera01.cnf
STOP SLAVE;
All changes to your live database after this point will be lost, so make sure the application database activity is really off.
If you have some special database views, which depend on MySQL users, it’s now the time to fix them on Galera side. If you don’t fix them, they will be causing problems later. Preferably, plan all actions thoroughly beforehand to keep things quick.
After all last-minute actions are done, reset the replication.
mysql --defaults-file=/tmp/galera01.cnf
RESET SLAVE;
To ensure that no false data will be replicated, point the replication master to a non-existing source:
mysql --defaults-file=/tmp/galera01.cnf
CHANGE MASTER TO
          MASTER_HOST='SOMEIP',
          MASTER_PORT=3307,
          MASTER_USER='NOBODY',
          MASTER_PASSWORD='NOPASS';
If you don’t have further databases to migrate, you might also just restart your Galera Cluster node after RESET SLAVE, for cleaning the replication configuration.
Now the old live database can be shut down, and the application can be pointed towards the load balancer of your Galera Cluster.
Congratulations, you have successfully migrated your data to Galera Cluster!
If you happen to have further databases, feel free to repeat the process as often as you need to. Note that replicating into Galera will affect the cluster performance, especially during loading the replication dump.
Every scenario should be tested thoroughly on a properly configured test system. Galera replication is a delicate construction, and things can go awry when using unorthodox methods like extra replication discussed here.
All’s well that ends well
Having your live data now running on a Galera Cluster, you can be proud of having eliminated yet another risk to your platform. No need to worry about faults on single components.
Galera is no silver bullet. All components will still need normal maintenance, and you should still take regular backups of your data. The difference is however, that you may now decide more freely, when the maintenance should take place, and it will be invisible for the end customer. Except if they happen to read about it on a devblog post 😉.