This is the first of a four-part blog post series about how we install a high-availability (HA) Kubernetes cluster for testing purposes with Debian 8. As part of this process, the whole cluster services communication is secured via TLS.
Outline
Kubernetes offers a wide range of settings. Therefore, in this series we focus on version 1.2.2 and its characteristics.
In order not to specify every command per host, we use role names for groups of computers. Considering the user and the workspace, a command could look as follows:
root@common:~$ ls -la /etcThis example shows a root user listing all files of the directory /etc of the computers with the role common.
In many cases we will avoid explaining commands in detail, as they are self-explaining. Any specific characteristics will be mentioned at the corresponding points.
In order to ensure that all content is well understood, some frequently used terms are explained in the Glossary at the end of this post. These terms are linked first time they appear in the post.
Prerequisites
Root certification authority (CA)
In order to use TLS, a variety of certificates are required. In this post, we assume that a root CA is already available. If not, it can be easily created.
Remote access
For executing the commands we use the Bash that Debian 8 contains by default. It can be reached via a remote console (ssh). The connection can be established with an additional user who is able to gain root rights.
Additional packages
In this series, we assume that the commands we use are installed via the package manager. Ensure the following programs are installed on all computers:
Load balancer URL
During installation a load balancer URL is used in several places and has to be available in the own network. In this simple configuration it is sufficient to enter the FQDN of the service nodes. So in our example, the load balancer URL always references to the service node.
Hardware assembly
Overview of nodes with their IPs and roles:
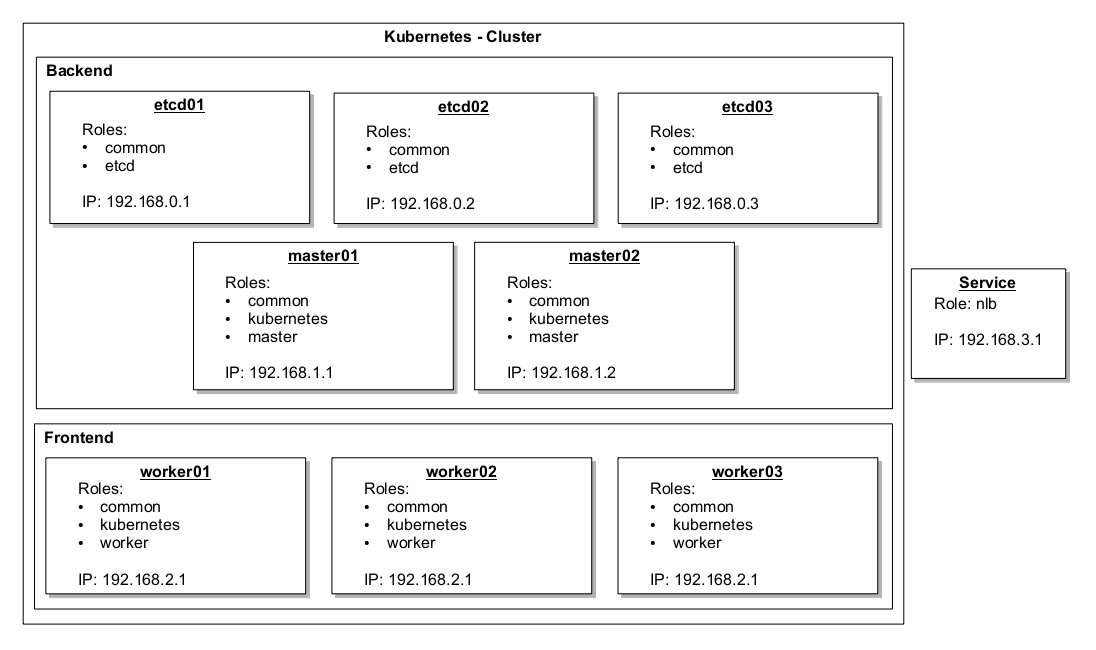
For this simple HA setup, we use 9 computers in total, which are listed in the image above according to their role and affiliation. Each computer has just one network card. The RAM size and number of CPUs was chosen according to the computer’s function:
- Etcd
- CPU: 2
- RAM: 1GB
- Disk: 15GB
- Master
- CPU: 2
- RAM: 2GB
- Disk: 15GB
- Worker
- CPU: 2
- RAM: 4GB
- Disk: 20GB
- Service
- CPU: 2
- RAM: 2GB
- Disk: 30GB
The service node outside of the cluster has a special functionality. For a using the cluster productively, a [load balancer](https://en.wikipedia.org/wiki/Load_balancing_(computing) is required which is provided by this computer. It is not part of the Kubernetes cluster, i.e. it does not run Kubernetes services.
Etcd installation
Let’s start our installation by configuring the etcd nodes. As etcd cluster they serve as centralized storage location for all important information.
Creating etcd peer certificates
First, create one certificate signing request for the so called peer certificate for each Etcd node. You will require the IP of the primary network card, on which the etcd service will be available later. In this example, it is 192.168.0.[1|2|3] depending on the node.
Basically, this process will be repeated several times, and then mentioned correspondingly.
root@etcd:~$ mkdir -p /etc/ssl/etcd
root@etcd:~$ cd /etc/ssl/etcd
root@etcd:/etc/ssl/etcd$ cat > openssl.cnf << "EOF"
[req]
req_extensions = v3_req
distinguished_name = req_distinguished_name
[req_distinguished_name]
[ v3_req ]
basicConstraints = CA:FALSE
keyUsage = nonRepudiation, digitalSignature, keyEncipherment
extendedKeyUsage = clientAuth,serverAuth
subjectAltName = IP:$ENV::PEER_IP, DNS:$ENV::PEER_FQDN
EOF
root@etcd:/etc/ssl/etcd$ openssl genrsa -out etcd.key 2048
root@etcd:/etc/ssl/etcd$ useradd -U -s /bin/false etcd
root@etcd:/etc/ssl/etcd$ chmod 600 etcd.key
root@etcd:/etc/ssl/etcd$ chown etcd:etcd etcd.key
root@etcd:/etc/ssl/etcd$ export PEER_IP=192.168.0.[1|2|3]
root@etcd:/etc/ssl/etcd$ export PEER_FQDN=$(hostname --fqdn)
root@etcd:/etc/ssl/etcd$ openssl \
  req -new \
  -key etcd.key \
  -out etcd.csr \
  -subj "/CN=$(hostname -s)" \
  -extensions v3_req \
  -config openssl.cnf \
  -sha256
 root@etcd:/etc/ssl/etcd$ cat etcd.csr # copy or cat the signing request
These commands generate a new file etcd.csr which contains the information to create a peer certificate. In order to issue the certificate, you’ll additionally need the openssl.cnf file. With the following scp-command both files will be copied to the computer on which the root CA certificate is available:
root@etcd:/etc/ssl/etcd$ scp openssl.cnf etcd.csr root@root-ca-host:To subsequently issue the certificate we use openssl again. Here, we have to consider the environment variables that have to match with the certificate signing request. Depending on the etcd node the IP and the FQDN have to be set correctly.
root@root-ca-host:~$ export PEER_IP=192.168.0.[1|2|3]
root@root-ca-host:~$ export PEER_FQDN=etcd0[1|2|3].example.com
root@root-ca-host:~$ openssl x509 \
  -req \
  -CA ca.crt \
  -CAkey ca.key \
  -CAcreateserial \
  -in etcd.csr \
  -out etcd.crt \
  -days 365 \
  -extensions v3_req \
  -extfile openssl.cnf \
  -sha256
In order for the etcd nodes to validate the certificate of the communication partner in case of a self-created root CA, the root CA certificate has to be attached to the generated certificate.
root@root-ca-host:~$ cat ca.crt >> etcd.crtYou then copy the peer certificate as well as the root CA certificate to the corresponding etcd node at /etc/ssl/etcd/etcd.crt or /etc/ssl/etcd/ca.crt.
root@root-ca-host:~$ scp etcd.crt ca.crt root@etcd:/etc/ssl/etcd/The following files together should be availabe on all etcd nodes with the correct rights:
root@etcd:~$ chown -R etcd:etcd /etc/ssl/etcd
root@etcd:~$ cd /etc/ssl/etcd
root@etcd:/etc/ssl/etcd$ rm -f openssl.cnf etcd.csr
root@etcd:/etc/ssl/etcd$ ls -la
-rw-r--r--  1 etcd etcd 4711 Jun  33 08:15 ca.crt # root-ca certificate
-rw-r--r--  1 etcd etcd 4712 Jun  33 08:15 etcd.crt # with trailing root-ca certificate
-rw-------  1 etcd etcd 4713 Jun  33 08:15 etcd.key
Installing the etcd daemon
In the next step we install the etcd daemon. It will be managed via Systemd. By using the EnvironmentFile parameter in the service description, the configuration can be easily outsourced to an extra file (options.env). As the option ETCD_ADVERTISE_CLIENT_URLS is node-specific, you will have to enter the IP of the primary network card per node. To simplify this, we use the variable PRIMARY_HOST_IP in the following commands:
root@etcd:~$ cd /tmp
root@etcd:/tmp$ curl -L -O https://github.com/coreos/etcd/releases/download/v2.3.2/etcd-v2.3.2-linux-amd64.tar.gz
root@etcd:/tmp$ tar -xzf etcd-v2.3.2-linux-amd64.tar.gz
root@etcd:/tmp$ cp etcd-v2.3.2-linux-amd64/etcd /usr/local/bin/etcd
root@etcd:/tmp$ cp etcd-v2.3.2-linux-amd64/etcdctl /usr/local/bin/etcdctl
root@etcd:/tmp$ chmod 755 /usr/local/bin/etcd
root@etcd:/tmp$ chmod 755 /usr/local/bin/etcdctl
root@etcd:/tmp$ chown etcd:etcd /usr/local/bin/etcd
root@etcd:/tmp$ chown etcd:etcd /usr/local/bin/etcdctl
root@etcd:/tmp$ mkdir -p /opt/etcd/data
root@etcd:/tmp$ mkdir -p /opt/etcd/wal
root@etcd:/tmp$ chown -R etcd:etcd /opt/etcd
root@etcd:/tmp$ mkdir -p /etc/etcd
root@etcd:/tmp$ export PRIMARY_HOST_IP=192.168.0.[1|2|3]
root@etcd:/tmp$ cat > /etc/etcd/options.env << EOF
ETCD_NAME=$(hostname -s)
ETCD_DATA_DIR=/opt/etcd/data
ETCD_WAL_DIR=/opt/etcd/wal
ETCD_LISTEN_PEER_URLS=https://$PRIMARY_HOST_IP:2380
ETCD_INITIAL_ADVERTISE_PEER_URLS=https://$PRIMARY_HOST_IP:2380
ETCD_PEER_CERT_FILE=/etc/ssl/etcd/etcd.crt
ETCD_PEER_KEY_FILE=/etc/ssl/etcd/etcd.key
ETCD_PEER_TRUSTED_CA_FILE=/etc/ssl/etcd/ca.crt
ETCD_PEER_CLIENT_CERT_AUTH=true
ETCD_LISTEN_CLIENT_URLS=http://127.0.0.1:2379,https://$PRIMARY_HOST_IP:2379
ETCD_ADVERTISE_CLIENT_URLS=https://$PRIMARY_HOST_IP:2379
ETCD_CERT_FILE=/etc/ssl/etcd/etcd.crt
ETCD_KEY_FILE=/etc/ssl/etcd/etcd.key
ETCD_TRUSTED_CA_FILE=/etc/ssl/etcd/ca.crt
ETCD_CLIENT_CERT_AUTH=true
ETCD_INITIAL_CLUSTER=etcd01=https://192.168.0.1:2380,etcd02=https://192.168.0.2:2380,etcd03=https://192.168.0.3:2380
ETCD_HEARTBEAT_INTERVAL=800
ETCD_ELECTION_TIMEOUT=4000
EOF
root@etcd:/tmp$ chown -R etcd:etcd /etc/etcd
root@etcd:/tmp$ cat > /etc/systemd/system/etcd.service << EOF
[Unit]
Description=etcd

[Service]
User=etcd
Type=notify
EnvironmentFile=/etc/etcd/options.env
ExecStart=/usr/local/bin/etcd
Restart=always
RestartSec=10s
LimitNOFILE=40000
TimeoutStartSec=0

[Install]
WantedBy=multi-user.target
EOF
root@etcd:/tmp$ systemctl enable etcd
root@etcd:/tmp$ systemctl start etcd
root@etcd:/tmp$ rm -rf etcd-v2.3.2-linux-amd64
root@etcd:/tmp$ rm -f etcd-v2.3.2-linux-amd64.tar.gz
After some seconds the etcd cluster should be initialized and prepared to store data. Use the following command to verify that:
etcd@etcd:~$ sudo -u etcd etcdctl --cert-file /etc/ssl/etcd/etcd.crt --key-file /etc/ssl/etcd/etcd.key --ca-file /etc/ssl/etcd/ca.crt cluster-health
member aaaaaaaaaaaaaaaa is healthy: got healthy result from https://192.168.0.1:2379
member bbbbbbbbbbbbbbbb is healthy: got healthy result from https://192.168.0.2:2379
member cccccccccccccccc is healthy: got healthy result from https://192.168.0.3:2379
cluster is healthy
Creating flannel networks
Network information for the later used flanneld are the first data to be stored in the etcd. These data can be easily created via a curl command. This command is executed on one of the etcd nodes, as the etcd service, additionally to the node, is also available on localhost:2379.
root@etcd:~$ curl -X PUT -d 'value={"Network":"10.2.0.0/16","Backend":{"Type":"vxlan"},"SubnetLen": 24}' http://127.0.0.1:2379/v2/keys/coreos.com/network/configThe network area used here (10.2.0.0/16) enables to operated flanneld 256 worker nodes with 256 pods each. Depending on the respective network infrastructure, this area has to be changed to avoid collisions with other networks. If e.g. the network (10.2.0.0/16) already exists in the own infrastructure, the applications within the cluster would not be able to access that network. The iptables rules of flannld would block a redirection.
Summary
The task of etcd in the Kubernetes cluster is to store the complete cluster information. In order to design a fail-safe storage you should operate several etcd nodes. In the described structure we tolerate the failure of an etcd node.
If you want to improve the reliability, you have to add further nodes. Encryption is ensured via TLS. By communicating via https the data of the etcd nodes are transferred in an encrypted form. The unique feature of the certificates is that we use one peer certificate per etcd node. One etcd node encrypts its communication with the participating clusters via the same certificate as for the the other participants when acting as a server. This simplifies the structure, as we don’t need both, a client and a server certificate, per node. The required settings will be done in the openssl.cnf. In this context it is important that the extendedKeyUsage = clientAuth,serverAuth is set. For the local administration you can also use an unencrypted connection via localhost. By using the etcdctl tool you can manage the content of the key-value store. In order to achieve this, the option –no-sync always has to be used, if you want to limit the interactions on the local etcd node.
root@etcd:~$ sudo -u etcd etcdctl --no-sync ls --recursive
/coreos.com
/coreos.com/network
/coreos.com/network/config
Glossary
Cluster
During operation, the whole computer network is called Kubernetes cluster or just cluster.
Nodes
A node is a computer that is part of a cluster, independent of its function. In case a special node is referred to, that belongs to a function group, we use a prefix, e.g. master node.
Backend/Infrastructure
Computers that carry out services that are mandatory to operate the cluster. These nodes are critical infrastructure and are to be operated redundantly.
Frontend/Worker nodes
Computers that execute the majority of the pods. The number of these nodes can be easily scaled, as these nodes do no execute mandatory services from a cluster point of view.
Pod
Within Kubernetes, this is the smallest unit in which containers can be managed. Pods can consist of one or more containers. The containers within a pod will always be executed on the same Kubernetes node and can easily communicate amongst each other via their Docker network connection.
API-Server
The API server is a Kubernetes core component. This pod is executed on the master nodes and provides the cluster API via https.
About the author
