There’s a confusing plethora of ways to install and setup Ruby and Rails. And many competing tools exist that claim to make the process easier. So how is one to choose the best tools for the job and get up and running with Ruby and/on Rails development as cleanly and painlessly as possible?
The information below applies specifically to setting up ruby/rails on a linux development machine, but much of it should be applicable to other systems like Windows and Mac OS X too.
The alternatives
1. Use the version that comes with your OS (package manager).
This is the quickest and easiest way to get up and running. If you’re using Linux then you probably already have Ruby installed, or can easily do so via your package manager (yast, aptitude, yum etc). However you’re stuck with the version that comes with your os, which may update ruby when it sees fit. Conversely any tampering you do with the installed version could negatively impact your systems. If you want full control of which version of ruby/rails your app uses (which for serious development you probably do) then this is not a viable option.
2. Download and install from source code
This requires setting up your machine for (c) development, and is probably the most time consuming and troublesome. In particular Ruby likes to install itself globally by default which may interfere with other programs or operating system components on your machine, which may break if you modify the global (os) version. This however does give you full control of which ruby/rails version you use.
3. Use specialised (Ruby) Management Tools
This is theoretically the ideal solution and one would expect a single tool (or set of tools) to be standard. However there’s a surprisingly large and diverse collection to choose from. For a detailed list see here. Basically the main contenders are:
An all-in-one tool for both installing a particular version of ruby and making one of those installed active. It’s one of the original tools and is (over)loaded with many features (e.g. managing gemsets). Using it can be quite complicated and error prone. If you have no compelling reason to use it they you probably should use one of the more modern and streamlined tools available nowadays (e.g. chruby … see below), that are more aligned with the unix philosophy of
Make each program do just one thing, and do it well.
Many ruby developers adopted rbenv in lieu of Rvm when in came out, as a means of switching the currently active ruby version.
It is leaner and cleaner.
The complementary plugin ruby-build can be used to install a particular version of ruby.
However it still has some drawbacks such as its use of shims and the need to call rehash each time gems or ruby versions are (un)installed.
This is a lot better than Rvm but things could be even simpler and cleaner.
That’s where chruby comes in.
The simplest and most lightweight ruby version manager of the bunch is chruby (weighing in at just 90 lines of code), for activating a particular ruby version. It’s designed to work with ruby-install when one wants to install a new ruby version. However I don’t recommend ruby-install (or any other ruby tool for that matter) for installing ruby if you want to do rails development - read on.
So which (combination) should I choose?
I recommend a combination of 2 and 3 above:
Build your ruby version from source (locally) and use chruby to activate it.
Prerequisites:
Install a c compiler with the associated development tools: make etc. Install node.js as its needed by the server at runtime. Install libxml2-devel and libxslt-devel (needed for nokogiri… see below). The best way to install these is via your system package manager (yast, apt, yum etc).
Info Modify the file paths below appropriately, and create the dir where you want to install first as a normal user (otherwise they will automatically get > created belonging to root, and you’ll need root privileges to work properly with them).mark
Build Ruby itself from source:
You can install ruby fine with a tool like ruby-install. However subsequently installing rails (as a gem) requires (at least on my system) access to source files like ruby.h. This is surprising but maybe it will change in future. In the meantime however, there are two options: make the files available globally or locally. If you install these (globally) via your OS (package manager) then you risk a version mismatch which may cause errors during the build (or worse, at runtime). The better alternative is to (locally) download the source code for ruby.
Info Note the use of prefix below to ensure that the files to be installed are written to local dirs (and not globally). This isolates your ruby version nicely, protecting any other apps that depend on the global version, and yours from any changes made to the global one.
> cd ~/declan/Downloads/ruby-2.2.3

> ./configure --prefix=/home/declan/dev/web_framework/rails/ruby/2.2.3/

> make

> sudo make install
Install chruby:
cd /home/declan/tmp/
wget -O chruby-0.3.9.tar.gz https://github.com/postmodern/chruby/archive/v0.3.9.tar.gz
tar -xzvf chruby-0.3.9.tar.gz
cd chruby-0.3.9/
PREFIX=/home/declan/dev/web_framework/rails/chruby/0.3.9/ make install
Info Don’t call setup.ch since it adds a “chruby.sh” file to /etc/profile.d/ which causes share/chruby/auto.sh to get run each system boot - you don’t want this.
Edit chruby.sh
To tell it about our custom ruby version:
RUBIES+=("/home/declan/dev/web_framework/rails/ruby/2.2.3/")
You can enter whatever (installed) ruby versions you want here and use chruby to switch between them later. The global system ruby is included implicitly (see below).
To activate your custom environment call:
source /home/declan/dev/web_framework/rails/chruby/0.3.9/share/chruby/chruby.sh  #make chruby available
chruby 2.2.3 	# activate version 2.2.3

ruby --version 	# outputs "2.2.3"
You can of course add this to a startup script like .bashrc to save you having to enter it manually.
Should you for some reason need to, you can at any stage switch back to the global (system) ruby:
chruby system
ruby --version      # outputs "2.1.3"
Install Rails
One should now be able to install rails as a gem. However doing so also installs a package called nokogiri which apparently has a bug, which breaks the rails install. The bug is related to the custom versions of files (libxml2, libxslt) nokogiri uses. To workaround the problem install nokogiri first explicitly telling it to use the system versions:
gem install nokogiri -- --use-system-libraries

gem install rails
rails --version      # outputs "4.2.4" - great!
You can now happily work away on your rails app using your favourite text editor and the command line. However it would be nice to also be able to benefit from a full fledged IDE eg. for visual debugging. The best choice here is Intellij IDEA or RubyMine (a streamlined down version of IDEA specifically for Ruby development).
Info NetBeans no longer supports Ruby/Rails.
Setup up Intellij
Make sure:
- The ruby plugin is installed in Intellij (Menu: File->Settings->Plugins).
- The gem “ruby-debug-ide” is installed (
gem install ruby-debug-ide). - The “Gemfile” for any project you want to debug with the IDE does not contain “byebug”. Otherwise the IDE will give obscure error messages and fail, when you try to debug.
- You start the IDE in your custom (chruby) environment.
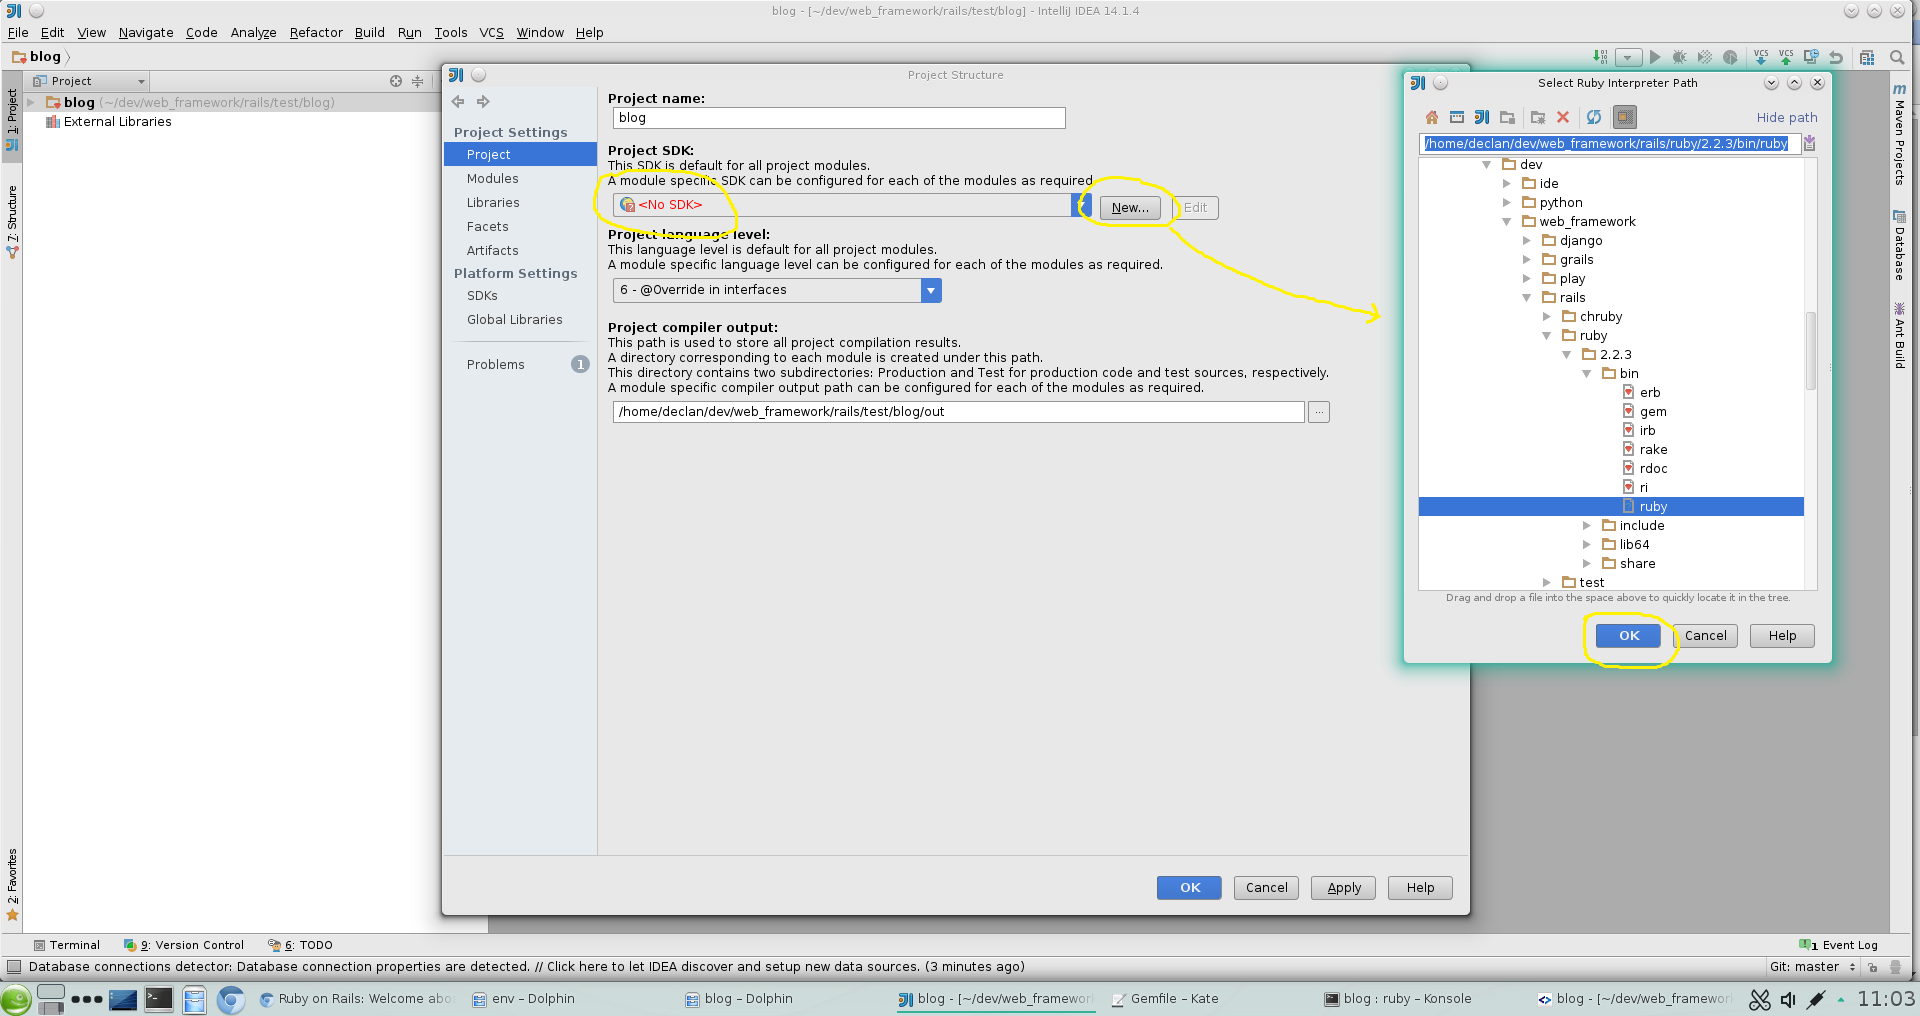
- You configure the rails sdk in the IDE’s project settings - see the screenshot below.
.gitignore
When you create your project with rails new a useful .gitignore file gets automatically created.
You’ll probably want to supplement it with the following however when using the IntelliJ IDE:
;;extensions to ignore
*.log
*.pot
*.pyc


.idea/workspace.xml
.idea/tasks.xml
See here for more details.