The general section about creating an app explains some of the concepts and the basic workflow required to develop an app. We also take care of the most crucial part, the OAuth 2.0 token exchange.
With this tutorial, we are going into more detail and explain exactly how you can implement all this in practice. We are using PHP, but the functionality is very simple and can easily be implemented with any other coding language.
You will see how the OAuth 2.0 exchange is done to get your access token and how you can use it to make API calls.
Prerequisites
In order to get this code working, you need to setup your development environment:
- PHP 5.2+
- publicly reachable server
Sign up for an ePages test shop
Simply sign up here for a free account.
Create an app
In order to create an app, to test it and to submit it to the App Store, you have to create an app.
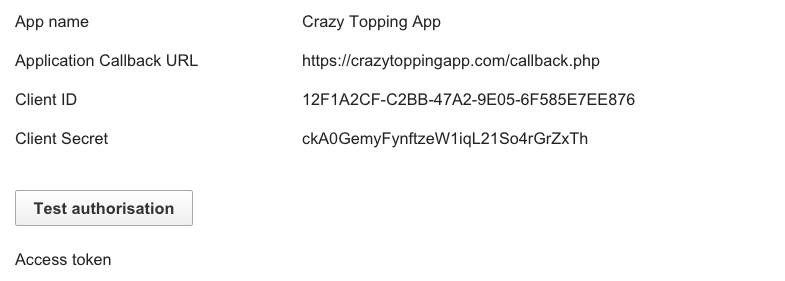
After choosing a name to your liking, you need to set the Application Callback URL to your publicly available PHP script (e.g. https://crazytoppingapp.com/callback.php), which we will implement later.
Note: We allow HTTP Application Callback URLs for apps, but you need to provide an HTTPS URL once you want to submit the app to the App Store.
Once you are done with that, the detail page will show your client credentials.
As you can see, there is no Access token right away. You have to go through the installation process first to acquire one.
The Test authorisation button basically simulates an installation by a user - in this case yourself. After the token exchange is done, you will receive an Access token, which will also be displayed on this page.
Note: Any subsequent calls will uninstall the app and reinitiate the installation process, which will result in a new access token (and invalidation of the old access token).
Getting an access token
For a more general overview of the installation process and the OAuth 2.0 token exchange, we recommend you to read though the installation process first.
Now that everything is in place, we can actually start coding.
We will create the mentioned callback.php file, which will be called when a user installs an app.
Setting credentials
The first thing we will do is set the client credentials (client_id and client_secret) you got from the apps detail page.
<?php

$client_id     = '0BE38CFF-F3B6-4D68-8F16-1CE270C028BC';
$client_secret = 'DkRUi6uo6KzglHmwOhFkVYNhcumCTOlP';
Listen for callback
Next, you need to listen for a request to get the authorization_code, which you can exchange for an access token.
The call, which you can trigger by clicking Test authorisation, will look like this:
https://crazytoppingapp.com/callback.php?code={authorization_code}&access_token_url={access_token_url}&api_url={api_url}
You need to extract the code, access_token_url and api_url to use later on.
We also send the return_url to redirect the user back to, as soon as he is done with the registration and installation.
$code             = $_GET["code"];
$access_token_url = $_GET["access_token_url"];
$api_url          = $_GET["api_url"];
Note: In a production environment, you would use the api_url as the unique identifier for the merchant.
You will also use it as the base URL for REST calls.
Exchange authorization code for access token
Now we need to exchange the authorization code for the access token.
We will create a function called get_token(), which will need the client credentials, the access_token_url and the code and will just print the access_token as a response.
$access_token = get_token($access_token_url, $client_id, $client_secret, $code);
echo $access_token;
Note: In a production environment, you would not disclose the Access token to anyone, not even the merchant. This token (depending on the scopes) has access to the merchants shop and is directly associated to your app.
Next, we need to actually implement the get_token() function.
In this function we need to:
- encode the client credentials and
codeasx-www-form-urlencoded, - pass them as a
POSTrequest to theaccess_token_urland - parse the JSON response containing a single
access_tokenvalue.
The encoded client_id, client_secret and code are assigned to $post_content.
After that, we set the necessary request options for curl:
- the URL,
- the HTTP method,
- the Content-Type-Header and the
- request body.
After a successful request, we receive a JSON-encoded response and return the extracted Access token.
function get_token($url, $client_id, $client_secret, $code)
{
    // request body
    $post_content = http_build_query(array(
        'code' => $code,
        'client_id' => $client_id,
        'client_secret' => $client_secret
    ));

    // curl options
    $curl_options = array(
        CURLOPT_URL => $url,
        CURLOPT_POST => 1,
        CURLOPT_HEADER => "Content-Type: application/x-www-form-urlencoded",
        CURLOPT_USERAGENT => "my-awesome-uniquely-identifiable-client/1.0",
        CURLOPT_POSTFIELDS => $post_content,
        CURLOPT_RETURNTRANSFER => TRUE
    );

    // curl request
    $curl = curl_init();
    curl_setopt_array($curl, $curl_options);
    $result = curl_exec($curl);
    curl_close($curl);
    return json_decode(utf8_encode($result))->{access_token};
}
?>
Use the API
After you have successfully received the access token, you can use it to make requests to the API.
You construct the available resource URL by taking the api_url and appending the resource you want to call.
If you want to list the products, you can make a simple GET request to the products endpoint.
We are using the command line tool curl in this example:
curl -XGET {api_url}/products
     -H 'Accept: application/vnd.epages.v1+json'
     -H 'Authorization: Bearer {access_token}'
The response will look something like this:
{
  "results": 1,
  "page": 1,
  "resultsPerPage": 10,
  "items": [
    {
      "productId": "55BB92D1-DE61-A290-24CD-7F000101F96C",
      "name": "Berghaus Paclite Jacket - Men",
      "shortDescription": "Weatherproof. Small pack size. Ultra light.",
      "description": "Weatherproof and compact. Ultra light.",
      "images": [
        {
          "url": "http://gecko/WebRoot/Store/Shops/DemoShop/Products/be_40401/be_40401_blue.jpg",
          "classifier": "Large"
        },
        ...
      ],
      "priceInfo": {
        ...
      },
      "forSale": false,
      "specialOffer": false,
        ...
      ]
    },
  ]
}
An overview of our available resources are listed in the API reference.
You can find the code in our GitHub repository.

